Actions and Reducers in React-Redux
Posted on Fri 25 September 2020 in Javascript • 4 min read
Redux is a predictable state container for JavaScript applications, and React is a JavaScript library for building user interfaces. To bridge the two, you get react-redux which allows our user interfaces to interact & respond to the current state of the application.
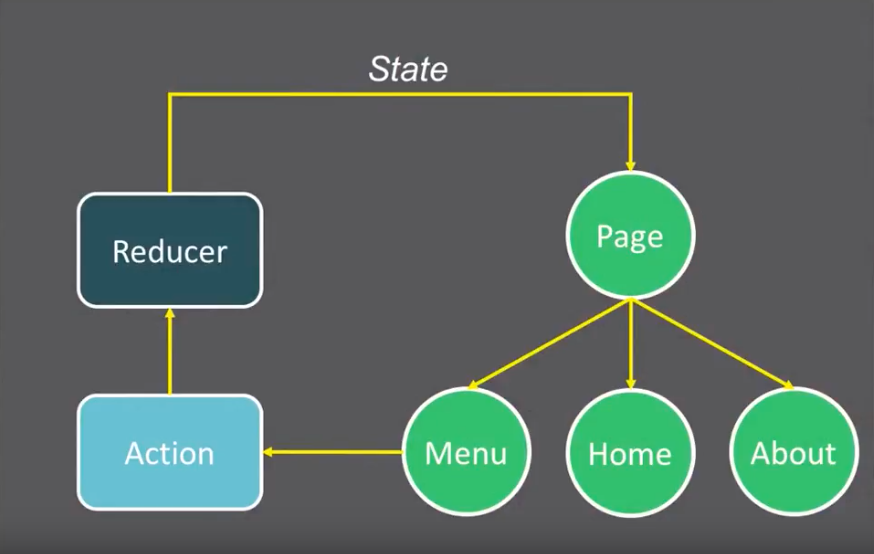
In this post let's go into actions and reducers. First off, what is an action and what is a reducer in this context? Actions are payloads of information that send data from the application to the redux store. Reducers specify how the application's state changes in response to actions sent to the store. It is summarized in the graphic:

Let's use react-redux to build a system which we can alert users when things trigger. For this we will need to build an action, a reducer and a component to display the alert.
To ensure that these three components are speaking the same language, we need to initialise types which will represent the states being passed around. These variables contain a string. For our alert system we need two variables
1 2 | |
Action
We'll start by creating the action which will signify when an alert is triggered. We want all of our alerts to be unique so multiple alerts can handled without a problem which we will use uuid.
1 2 3 4 5 6 7 8 9 10 11 12 13 14 15 16 17 18 19 20 | |
The action is declared as a function, which takes in 3 arguments (2 required): msg, alertType and timeout. Which we then use call the dispatch function with an object constructed from the arguments, and then after a specified timeout we dispatch another object to remove the same alert.
Note that we curry the dispatch function in this case, this is only possible from using the middleware redux-thunk, which can also be represented as:
1 2 3 4 5 | |
There is a much more fleshed out answer to how the currying works out in the end over at: https://stackoverflow.com/questions/35411423/how-to-dispatch-a-redux-action-with-a-timeout/35415559#35415559.
Component
We need to be able to somehow show the alert on the page to the user. There is a very little chance that the user will sit in the console and monitor the state of a redux component changing (for which the Redux Devtools Extension is useful).
Let's display the alert as a div, with colouring to match the type.
This post won't go into detail around how to build a React component, which you can find over at another post: [INSERT REACT COMPONENT POST]
1 2 3 4 5 6 7 8 9 10 11 12 13 14 15 16 17 18 19 20 21 22 | |
To break it down, we've created a React component (class) Alert which takes in alerts as an array, verifies it isn't null or empty, and finally iterates over each element in the alerts array to return a div stylized with the appropriate information.
Reducer
Lastly we have the reducer which we want to handle all the states that can be created by the alert action. Luckily we can do this with a switch statement:
1 2 3 4 5 6 7 8 9 10 11 12 13 14 15 | |
We define a function that takes in a state, and an action to act upon. We deconstruct the type and payload from the action to make things more readable. Now that we can switch across the different action types we do the following.
Set Alert Action
If a SET_ALERT action is dispatched from our action we defined earlier, our reducer needs to update the relevant component which we also defined earlier. As such we return an array (which will become the alerts array) which contains the updated state of the application (using the spread operation to deconstruct the state object and concatenate it with the payload).
Remove Alert Action
For this action type, we return a filtered array containing all the alerts except the id that was identified in the payload.
Default
If neither setting or removing an alert, don't change the state at all.
Conclusion
Using react-redux we can create a responsive web application which enhances the user experience!