Episode 9 - Web Enabled Universal Remote - Part 1
Posted on Fri 18 January 2019 in Engineering • 3 min read
I have a habit of misplacing all kinds of remotes within the house, TV, air conditioner, fans, etc, and having a different remote for everything can be quite annoying at times. So I decided to re-use some leftover components from a previous project to make a web enabled universal remote.
Since most existing remotes use infrared to send the signal from the remote to the device, I figured it would be simple enough to create a infrared signal 'decoder' and then use a infrared diode to then replicate this signal back to the device. Next consideration was what do hardware is needed to get this project up and running.
After researching a few other DIY remote control guides on the internet, I came up with a plan to use a wifi-enabled microcontroller together with an infrared receiver and an infrared diode. After rummaging through my spare hardware box, I happened to find a spare NodeMCU (ESP8266) that I could use for this project, this brings my part list to:
- Wifi-Enabled Microcontroller (NodeMCU)
- A resistor to dampen the diode signal (100 ohm)
- A transistor to boost the current from the NodeMCU so the diode signal gets to the device (2N222)
- Infrared receiver (TSOP4136)
- Infrared diode (L-7113F3BT)
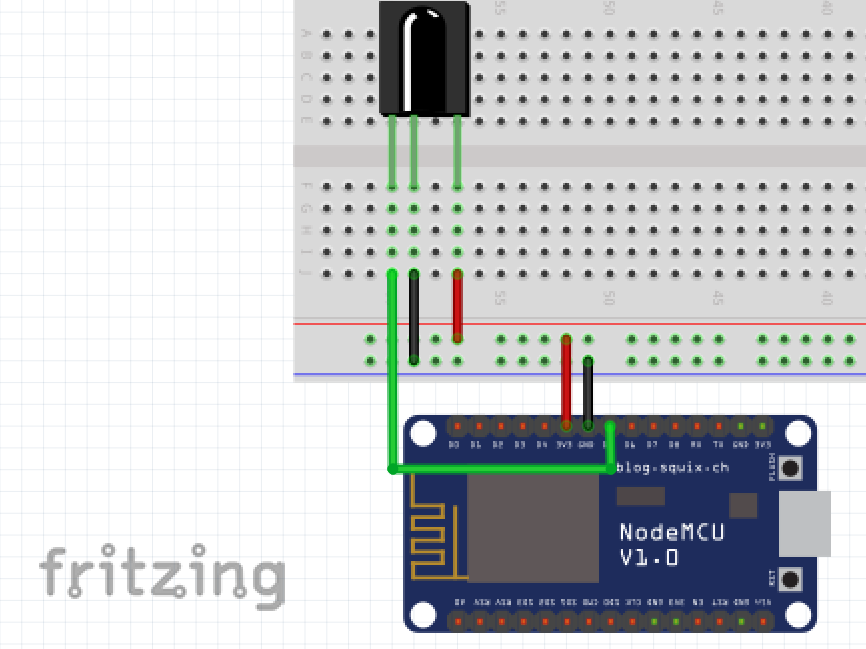
Now before connecting the entire circuit together, one should always test that components work in an expected way. To achieve this for the infrared receiver, a basic program to interface between the receiver and the microcontroller is needed.
For a basic test, an LED would light up whenever the infrared is receiving a signal. By following the circuit diagram with the corresponding code for the NodeMCU, this test for the receiver should be reproduce-able at home, please note that for other infrared receivers you will need to check the pin outs.
1 2 3 4 5 6 7 8 9 10 11 12 13 14 15 16 17 18 19 20 | |
In the code above, this defines the pins that the sensor and LED are connected to, checks if the sensor is receiving a signal and then switches the builtin LED accordingly. Since the microcontroller loops without delay and an infrared remote control sends signals very quickly with delay in between, the LED only flickers when a remote is aimed at it, however proving the component works as expected.
Now that we have confirmed the receiver works as expected, we have to integrate and interface the infrared diode with the microcontroller such that we are able to send the decoded signals back at the device.
Since the NodeMCU can only pass a maximum current of 12mA through the GPIO pins, this will not be enough for the infrared diode peak spectrum which occurs at 20mA. To boost the current up from 12mA to 20mA+, it is best to use a simple transistor, for this project I had some 2N2222 transistors lying around so decided to use them. The following circuit diagram shows how the infrared diode, transistor and microcontroller integrate together.

Since the human eye cannot see the infrared diode turning on/off, this creates a challenge for testing this component before implementing the project. I did not create a test specifically for the diode, and will test whether it works correctly later on in some function testing of the project.
This completes the hardware component of this project, the next part of this project will be the software. I am planning to utilise both docker and django on my home Raspberry Pi to act as a webserver that will issue commands to the microcontroller over a network to mimic the device's remote control.